Although the art of hammer dulcimer playing once appeared to be dying, a revival of interest has been slowly spreading in recent years. People unfamiliar with the dulcimer are pleasantly surprised by its clear, ringing tone and the animated dance of the player’s hands. Those who are curious enough to explore further discover that playing a melody is a very simple matter.
Old dulcimers are now scarce in most areas, and few craftsmen are making them for sale on a regular basis. At first look, the construction of a hammer dulcimer may appear to be a formidable undertaking to anyone but a master craftsman. This need not be the case. The purpose of this leaflet is to set out in concise fashion guidelines for easily building a durable instrument which will be acoustically and visually satisfying enabling potential players who cannot find or afford a dulcimer to quickly build a successful instrument and get on with music making. Possibilities may suggest themselves so that those who are adventurous and sufficiently skillful will evolve and invent their own designs.
A great deal of variation can be found in dulcimer design; some are simple and some more elaborate. However, by proceeding deliberately and with common sense one can complete a very satisfying instrument from the most unsophisticated of designs. There are simple ones made of pine that are every bit as desirable in terms of tone and playability as fancier and more complex dulcimers.
A dulcimer must be constructed with two primary goals in mind. One is to provide a very rigid platform for many strings at high tensions. The other is to provide an adequate vibrating surface and sound chamber for tone production. Most stringed instruments, guitars for instance, suffer in volume and responsiveness if built too heavily and sturdily. This is not much of a problem with the dulcimer, however, since a player can get greater volume by striking with more force and using harder material for the hammer heads. In fact, a too-brilliant dulcimer will sound harsh due to overemphasis of the percussive sound of the hammering.
The gauge of wire, the number of strings to be used, and the pitches they will be tuned to are all factors which determine the amount of stress on a dulcimer frame. If the frame warps or the joints do not hold solidly, then the instrument may not stay in tune.
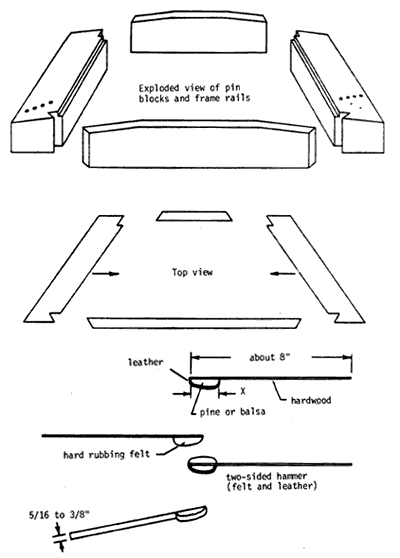
The accompanying illustrations should be almost self-explanatory. Notice the joint used between the pin blocks and the frame rails (Figure 2). The angled joint will stay together under the tension of the strings which pull the pin blocks toward one another. It may take some patience to make a good-looking joint with hand tools, but even if joined sloppily this design should prove durable. We are not condoning poor craftsmanship but merely suggesting that your chances for success are great regardless of woodworking experience.
A good way to start is to sketch out a full-size plan on a sheet of plywood 2 feet by 4 feet. This will become the back of your instrument. Unfinished birch plywood in thicknesses of 3/8 inch to 1/2 inch serves nicely and is not too expensive. A good straightedge and tape measure are handy for laying out the design.
The string lengths given are good ones for a dulcimer using steel music-wire strings and tuned as indicated in the information leaflet on dulcimer history and playing which is a companion to this one. You can extrapolate the lengths necessary if you desire a different tuning range. Remember that a string must be rather tight in order to sound out clearly, but if it is too tight it may break, bend the hitch pins and ruin the pin blocks, or warp the instrument.
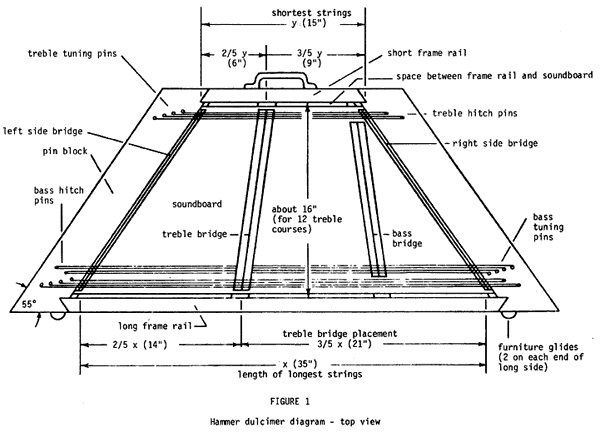
A dulcimer with 12 treble courses and 4 strings per course makes a good, all-round instrument. The hammer dulcimer diagram and dimensions are for such an instrument. If you want a simpler project, make the frame smaller to accommodate just 9 treble courses. There has been some fine playing on 9-course dulcimers.
After reading the leaflet on tuning and playing you may decide to include some bass courses on your dulcimer. They are handy but not necessary. Some very fine players do without them. Bass strings will add to the complexity of your project. We suggest providing at least 7 bass courses if you go to the effort of incorporating any.
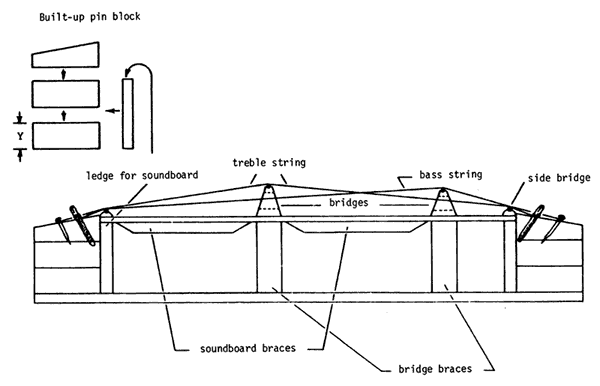
Use 3/4-inch-thick hardwood lumber for ideal frame rails. The pin blocks should also be of hardwood. You may want matching wood all the way around or contrasting woods for blocks and rails. Either can look good. Hard maple is perhaps best for the pin blocks, although there have been acceptable results with especially hard pieces of birch, cherry, and walnut. Soft woods such as pine and woods that may split easily such as oak should not be used for pin blocks. If necessary, the pin blocks can be built up to proper height by gluing several boards together (Figure 3). The number of boards needed depends on their thickness (dimension Y in the diagram) and the height desired for the final pin blocks. The frame rails should be 3 1/2 to 4 1/2 inches high in the center but can be tapered lower at the pin blocks.
If you have access to a band saw, radial arm saw, or circular table saw it will speed the cutting of the frame parts. Cut the back a little larger than the outside dimensions of your sketch. Glue the long frame rail to the back with Weldwood Plastic Resin Glue. If you don’t have clamps, put screws through the plywood back into the hardwood frame rail to secure it in place. Drill holes for the screws before gluing and screwing. This will leave no doubts about the strength of the bond.
Next, calculate the positions for all pin holes and drill the pin blocks. The holes must be slightly smaller in diameter than the pins. Plan the spacing so that all strings in one course are close together and so that there are 1-1/4 inches or more from the center of one course to the center of the next.
Heavy gauge nails or #8 piano bridge pins (.109 inch in diameter) make adequate hitch pins. When putting these in, hammer carefully so that the pin block is not split or damaged.
Either piano or zither tuning pins may be used on a dulcimer. Zither pins are preferred since they are lighter and require a smaller tuning wrench. The greater size and friction of piano tuning pins aren’t necessary for the moderate tension of dulcimer strings. Notice that the tuning pins are threaded; they work just as screws do. To install, place a pin over its hole and screw it into the wood with clockwise turns of the tuning wrench. Exert considerable downward force at first to insure that the threads catch properly. It is wise to practice on a scrap piece of wood before risking your pin blocks. Turn each pin well into the wood leaving about 1/4-inch of thread still exposed for stringing and tuning.
The two pin blocks and the short frame rail must all be assembled at the same time. Put in some hitch pins and tuning pins at this time; they can be removed later when the frame is to be varnished or finished in some other manner. Music wire can then be strung and tightened at several points to pull the pin blocks toward one another during gluing. This insures a firm joint between the blocks and the frame rails. Again, use Plastic Resin Glue and strong clamps or screws.
After the glue dries, the back can be trimmed flush with blocks and rails and all surfaces planed smooth and sanded to your satisfaction. Ledges should be glued on the inner side of the pin blocks (Figure 3). This is where the soundboard will rest. The ledges must be at least as wide as the side bridges. When the strings are in place and tuned they will hold the side bridges and soundboard firmly against the ledges.
The soundboard can be made of spruce, pine, or various other materials including plywood. Basswood, birch, or softwood plywood in thicknesses of 1/8 to 1/4 inch are easy to work with and yield a pleasant tone. Quarter-sawn spruce is a highly regarded soundboard material, but you will probably have to join two or more widths of spruce together to make a soundboard. Let the grain run parallel to the parallel sides of the soundboard. Make certain that joints in a spruce soundboard fit well and are properly braced by cross-grain strips of wood on the underside. The backs of fine guitars are joined in such a manner. Look through the soundhole of a guitar and notice the cross-grain strips, usually of spruce, which reinforce the center joint.
Heavy braces are glued on the underside of the soundboard along the top and bottom parallel edges. These should come almost up to, but not interfere with, the bridge braces (Figure 3). The soundboard should rest on the side ledges and bridge braces but should not touch the frame rails. Leave space between the parallel edges of the soundboard and the rails; the exact distance is unimportant.
Soundholes are unnecessary because the space at the frame rails provides for air pressure equalization between the inside and outside of the sound box. Holes can be added for decoration in any design you choose, but the openings should be kept small to prevent weak spots and warping.
The soundboard should fit loosely in place and should not be glued. The downward force of the strings will keep it in place, yet the soundboard will also be able to expand and contract with changes in humidity without warping or cracking.
If you look at the drawing of the treble bridge (Figure 4) you will notice that it is shorter at one end. This end will go under the shorter strings. The treble bridge need not be sloped this way if the side bridges are relatively high. The important point is that the strings, when tuned to proper pitch, must be displaced upward sufficiently by the side bridges so that the bridges are held down with considerable force. We suggest making the bass bridge about 1/4 inch lower in height that the treble bridge. Cut grooves in all bridges so that heavy wire may be placed on them to bear the pressure of the strings.
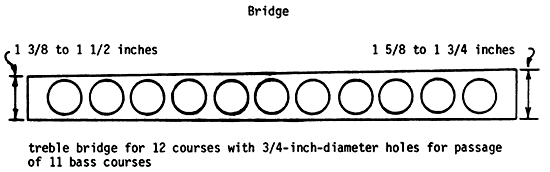
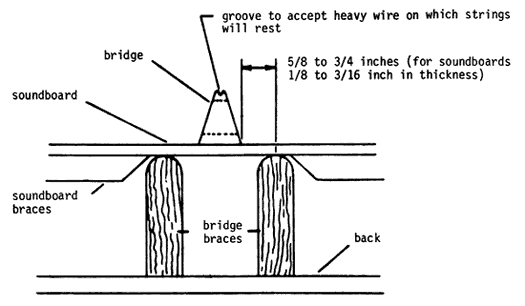
Figure 4
Optional bridge bracing plan
The bridges will be held in place by the strings and should not be glued. You will have to maneuver the treble bridge back and forth in order to tune the strings on either side to a perfect fifth interval. Placement of the bass bridge is not critical. It works well to have it about 8 to 12 inches away from the treble bridge.
After calculating exactly where the bridge braces will go, glue them in place with a little white glue, such as Elmer's Glue-All or Franklin Evertite. This is merely to insure that they will contact the back firmly without buzzing.
The instrument may be finished in any way you choose. We prefer natural satin finishes such as linseed oil, clear varnish, or combinations of oil and wax. Allow all parts to dry for several days before putting in pins, positioning soundboard and bridges, and stringing. Do not apply any wax to pin blocks.
If you intend your instrument to be portable, add a carrying handle. It is handy to have some sort of rests, such as furniture glides, on the side opposite the handle. You can put feet on the back of your dulcimer so that it will stand steadily on a table or playing stand. It works well for the feet to tilt the dulcimer toward you a bit for ease of playing.
Most players evolve their own ideas about hammers. You will too. The illustrations (Figure 2) show some favorites. Leather-covered hammers are louder and bounce well; felt ones give a softer, more mellow tone. The length of the head (X in Figure 2) should be great enough that it will not fit in between adjacent courses, where it might get caught while playing. Neither should it be too long and bulky. If the handles are thin and flexible the hammers will bounce nicely on the strings.
For the tunings and dimensions indicated, use steel music wire of relatively light gauge. We find that #8 wire (0.020-inch diameter) usually works out well for all strings. Use #6 or #7 wire if you are unsure of the rigidity of your dulcimer frame or if you prefer a soft, delicate tone. Heavier wire gives more volume but also results in harsher tones and more stress on the instrument. If your dulcimer has a very thick soundboard and sturdy frame, you may prefer a heavier gauge. Experiment with different wire and hammers until you discover combinations you like.
When stringing, make sure that the wire takes several turns around the tuning pin before pulling tight. This ought to keep the wire from pulling loose and going out of tune. It will take several days and retunings before a newly strung dulcimer will stay in tune long without going flat. This is to be expected, as the steel wire will stretch. If tuning problems persist, check for signs of warping, cracking, bending of hitch pins, and other signs of structural failure. Make sturdy repairs before retightening strings.
People often ask what designs to use to get the "richest" or "most brilliant" tone. As indicated earlier, brilliance and responsiveness are not necessarily desirable traits. We do find, however, that we enjoy these qualities when playing with very soft felt hammers. The optional bridge bracing plan illustrated here is one of the simplest and most effective ways we have found to allow the soundboard to respond more freely to the vibrating strings. Instead of one brace under the treble or bass bridge, there are two. These are placed slightly to either side of where the bridge rests so that the soundboard under the bridge can act as a diaphragm. Use caution, however, because the soundboard will warp or cave in if the braces are too far apart. Experiment, but use good sense!
Most supplies and tools you will need can be found at lumber yards and hardware stores. Large hardware stores even carry music wire. A local piano tuner or repairman may have wire and tuning pins to sell or may consent to order them for you. They usually don’t stock light-gauge wire or zither tuners.
A dulcimer can be made with only 12 to 15 hours of labor. However, you should expect to spend at least 30 to 40 hours on your first one if you include bass strings and intend to do a good job. Select wood that is free of cracks and warps and is worthy of your efforts. Perhaps, if you work carefully, your instrument will live to give pleasure to many people.
Good luck!
Authored by Sam Rizzetta
Prepared by the Division of Music, Sports and Entertainment,
in cooperation with Public Inquiry Services, Smithsonian Institution
PIMS/AH20-8/81B
updated 10/97